Thursday, September 24, 2015

At First Blush- making the hat


 A soft knit covering has been added over the blocked crown to hide the grain of the buckram.

The brim is a finer buckram so it didn't require the knit. Both sections have been covered in blush silk and gold lace has been applied.


I turned a light on to capture the metallic of the lace ad the sparkle of a few scattered AB rhinestones..

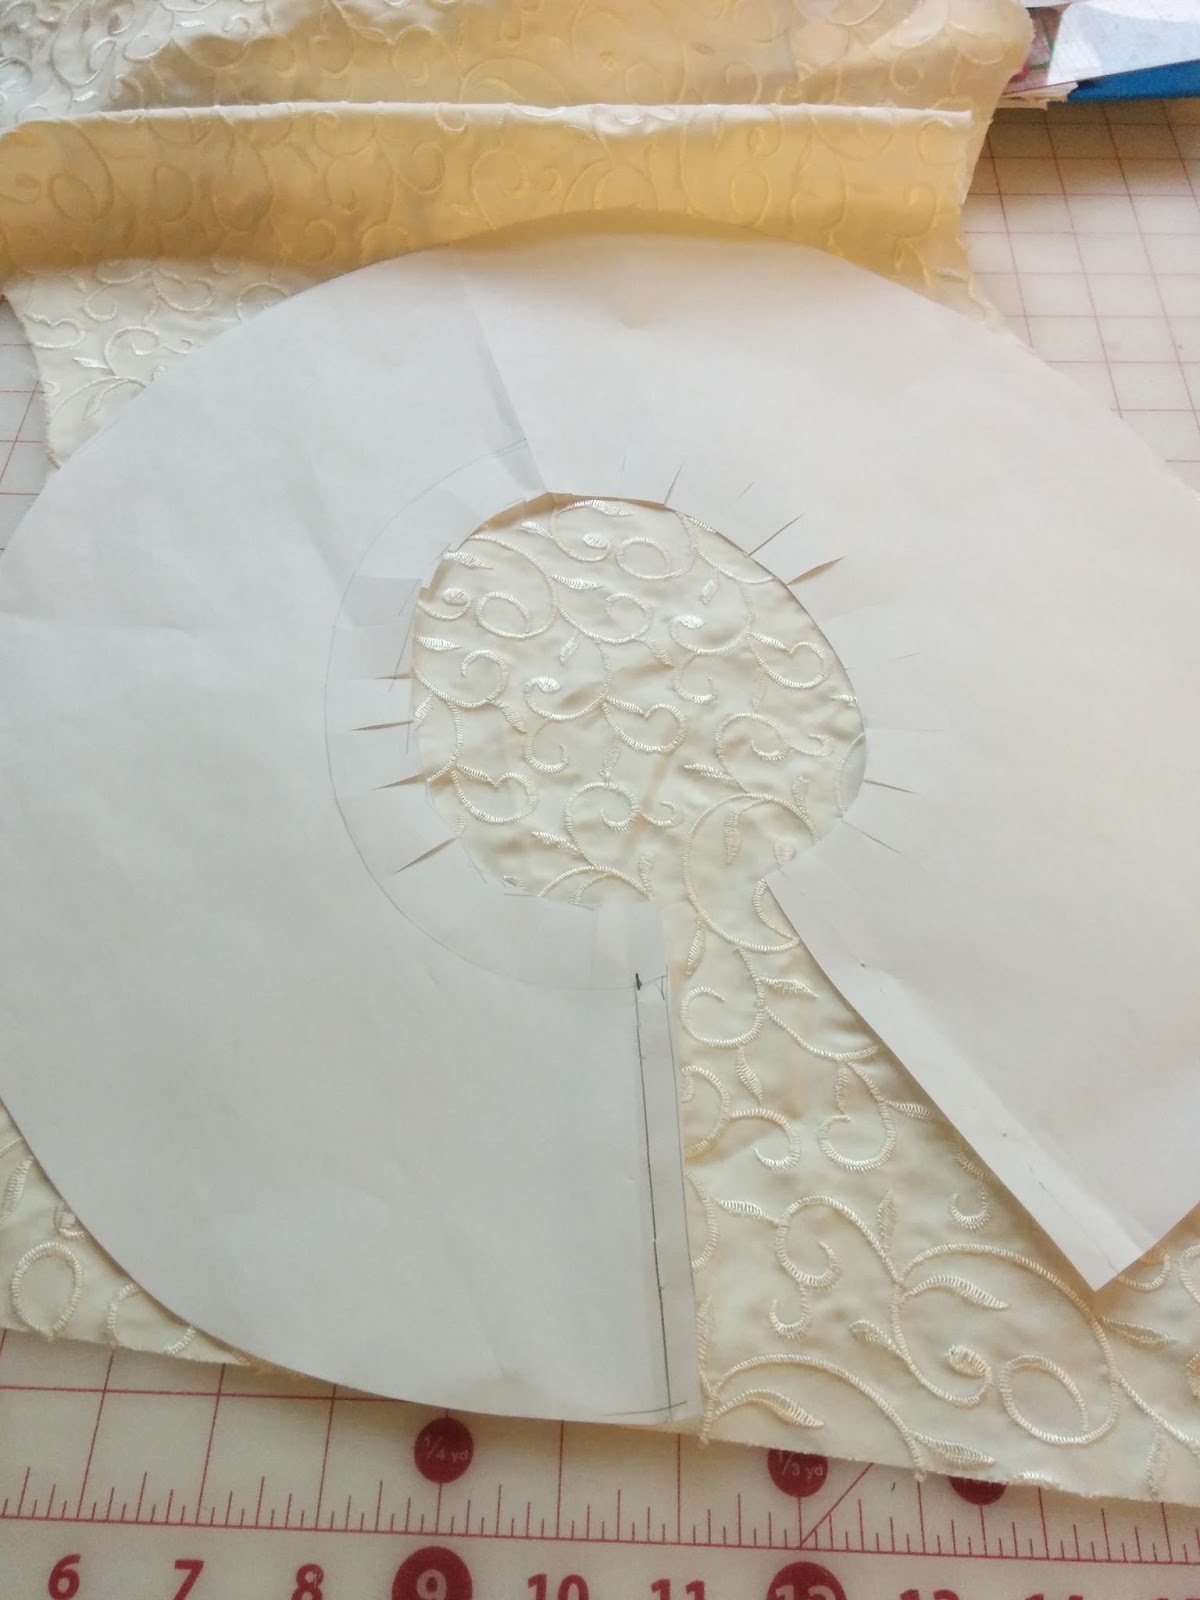
I had just enough of this beautiful vine and leaf embroidered ivory satin to  cut the brim lining.


The lining was added after the lace was sen on to hide the stitches.


 Binding the edge. The bias folded, and the raw edge basted together, then stretched slightly and pinned on to check the length. It was sewn into a circle by machine and hand sewn to the wired edge.
I marked the width of the bias on my thumb to keep it accurate and speed up the stitching.


Friday, July 3, 2015

At First Blush

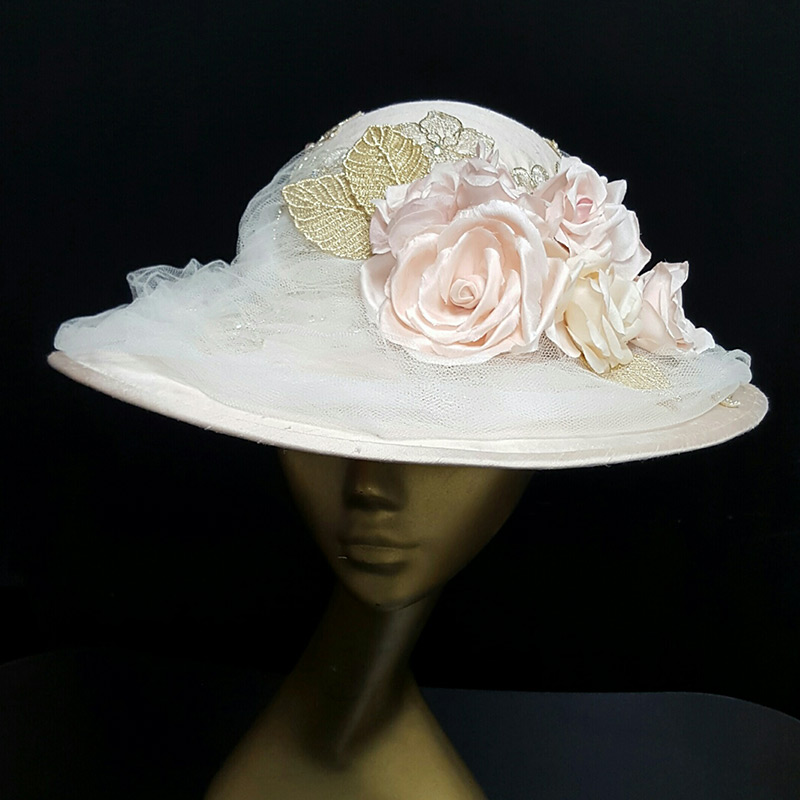
Silk hat with gold lace and silk tulle embellished with hand made, hand dyed silk roses in varying tones of blush, ivory and pink.


Monday, October 20, 2014

Talents

Our natures and talents can inspire and urge us to create. Sometimes, however, there are too many pushes and pulls which can lead to a state of stasis. Being multi talented is not easy: it can be very distracting. Trying to make a living from one's creativity can further complicate this. Market trends, cheap imports, giving up one's own choices to make something more affordable, more trendy, more saleable all can make it less yours. Less yours is less fun, less fun leads to burnout. Burn out is hard to feed to your children.
I'm thinking of a friend who is going through a situation right now. I hope it resolves itself. Breath deeply, recharge, enjoy the leaves.

Wednesday, July 23, 2014

Some Prettier Hats


I endured a back injury in late 2010. In true Canadian fashion, I slipped on ice. That was it. A quick slip and my life has been thrown completely out of whack!
I have a few slipped discs in my back that cause me pain. Some days it is quite severe and on others I can work away happily and comfortably. When discussing my back issues and my job as a dressmaker with my Doctor, he told me to stop the heavy work. He said: "No more embroidered Irish dresses, no more wedding dresses, nothing heavier than a hat." Well, I took him literally and have been taking millinery courses at college since then.
Here are two from last term. The first is a sinamay pillbox covered in black sequined lace with a handmade silk flower detail and French netting trim. Below that is a small bridal hat. It has a buckram base, covered with a woven tubes of silk chiffon and some more handmade flowers and netting.

These are some flowers and headpieces in progress. I love how pretty (albeit disorganized) my studio looks when I am making flowers.

Tuesday, July 22, 2014

Hat in wool felt and satin


This hat is made from buckram, satin , wool felt and a lot of paint.
There are also some grommets on there.


Sunday, May 19, 2013

More leafing

Leaves after using heat tool. I used a Clover Mini Iron with various attachments for it as well as some from my wood burning tool. They were a bit trickier because they were thinner and shorter than the Mini Iron was made to take.


This is the backside of one leaf showing the organza and the wire between the layers. I need to learn to place the wire more accurately and follow it in the tooling. This one isn't too bad but another one is quite messy.


 Three leaves. I like the other colours within these examples. I thought they looked like mistakes at first but prefer them now.

This picture shows the leaves with the sharp line done on top. I used a pointy tip and drew the lines, then turned them over and used a rounder tip to push up the sections between the lines. on the variegated leaves I added the smaller veins first. On the more olive leaves I did the main vein and added the smaller ones after the rounder tooling.
These have had the rounder tip used. On the two shown here I did the main vein then the round tip then went back to the upper side and added more veins.  
Five completed leaves!

Thursday, May 16, 2013

Leaves


I am finished the Millinery course I have been taking at George Brown College in Toronto.  I had to travel there and stayed with a friend. Usually I went on the Sunday evening and returned on Tuesday late afternoon so it took a large amount of time for one three hour class. I stayed with a friend. I could have taken the Monday train but had I missed it I would have missed the class so I went early.
Now that it is over I had some extra time on my hands. It has been so hectic trying to work, look after the kids (who styed with their father while I was gone) that my place was a mess. After some major cleaning and tidy-ing I allowed myself some creative me time and decided to indulge in something I have wanted to do for years.
I have long been fascinated with millinery trimmings so I decided to try to make some leaves and flowers based on information from books and the internet. I combined several methods in doing these which I will post later. I have some cleaning up to do before I can find my books right now.
I started with some silk I had on hand. It is a silk satin with a tendency to curl to the wrong side. It took both dye and paint beautifully. I used Folk Art Fabric and Setacolor paints as well as Colorhue dyes to get the effect I wanted. The silk was underpainted with the paints but I painted with the dyes overtop to get it a bit deeper. I would have thought the opposite would be the way. Live and Learn.
I heat set the paints before I used the dye. You can see the paint as the lighter tone of green and blotch red in the upper part of the image.
Some of the leaves were cut with the satin side up and some with the matte side. The painting was done on both sides depending on which side I intended to use to the lines aren't as noticeable as the lower left leaf suggests. 

After the dyes dried, I cut the leaf shape on the bias and used a fabric glue to glue them to a piece of orgaza I had dyed previously with a piece of florist's wire in between. This technique comes from here: http://presentperfectcreations.blogspot.co.uk/2013/04/a-mini-tutorial-on-how-to-make.html . Previous to this I had been using silks that I fused together with fusible web. I have pictures of those as well that I will share.

I like the way they look already. The blotchy bits are my favourite parts. Next comes shaping with a heat tool.

Wednesday, March 27, 2013

Dragon Scales Applique

I seem to have issues posting on Blogger which make me not want to write. The Dragon Scales have been done for a while but my frustration has prevented me from completing this. I am going to try writing in one post and pictures in another.

I turned and laid out the appliques, arranging them in a "controlled random" fashion. Some of the lighter ones were semi transparent so I cut and inserted cotton broadcloth into an interlining for those pieces.

Dragon Scales Part 2


I laid them out to have a look before turning.

Thursday, March 7, 2013

Scallops- aka Dragon Scales


While at a quilt shop recently, I was inspired by an Oakshott cotton charm pack. I decided to create a scalloped design and am making it into a pillow. I created a design using as much of the square as I could and used interfacing as a facing for the scallops.
The interfacing was sewn with the fusible side to the right side of the fabric and stitched with a 1/4" seam allowance. I was able to get two scallops from each square.
They needed to be notched and turned and soon I had a pile of little scallops. I laid them out on a square and discovered that I need more so will need to dig into my stash. I had bought a set of fat quarters in the Oakshott last year so will finally use some of them. Most of the Oakshott fabrics are shot cottons, where the warp and weft are different colours. This gives them a depth and richness. They are very lively appearance compared to regular solids.


Wednesday, January 23, 2013

Winter 6 pac- first 3 pieces


Camisole in black stretch lace with nylon/lycra blend bottom. I did not use a pattern for this: I just winged it.
First I cut the cups after holding the lace over my bust to get an idea of the size needed. I sewed the cups and added straps, then added a parallelogram of fabric for front and back loosely based on a t-shirt. I finished the upper back edge with stretch lace.
When I tried it on without a bra, the girls falling below the bottom of the cups so I added more stretch lace on the inside front below the bust. Then they were staying up, but fell out at the sides so I added a strip of power mesh to the back, above the existing stretch lace and finished with lingerie elastic at the top.  I don't think I could recreate it exactly, but I do like it enough to try. It is warm under my clothes and the deep V shows less under a top than some of my purchased camisole tops.

I also made the panties. Hate to say it but I am much bigger than this dummy and things are much snugger on me.

The robe is made from a limp nylon mesh. It is very comfortable. It has a raised neckline and a front drape but the limpness really makes these hard to see. The edges have a rolled hem finish done on my serger. I used stretch elastic at the waist and a bias strip of silk that was hanging around for a tie at the waist. There is not much of a crossover so the front drape is handy for modesty. I don't usually wear it over the cami and panties like this so the general effect is not sexy. My apartment has radiators with no turn off valves and the robe works well however hot it is here.